Assembly Methods – Using Your Hook
© Sandra Petit, http://www.crochetcabana.com
There are two basic categories when it comes to methods of assembly for crocheted pieces–methods that use a needle, and methods that use a crochet hook. This page will detail some of the options for joining your pieces using your hook.
Slip Stitch Assembly
Lay your pieces right sides together, insert hook through the last stitch of both squares and pull through, draw through all loops on hook to make a slip stitch. You can work through back loop only (my preference) or through both loops, whichever you prefer. Continue making slip stitches, going through loops on both squares. The side facing you will look like chain stitches all in a row. Secure at the last stitch and finish off. Sew in ends.
Single Crochet Assembly
If you use this method, you need to decide if you want your stitches to show on the right side or the wrong side. There will be a raised ridge at the joining and it will “lean” in one direction. If you want it to show on the right side, put wrong sides together (meaning facing each other). If you want it to show on the wrong side, put right sides together. You can also work through one loop or both. If you work through back loop only (BLO) you’ll get a pretty ridge and your work will lie flatter, at least mine does.
Caution: Be sure your single crochet leans in the SAME direction on all pieces. Pay attention!
Joining Single Crochet strips with Single Crochet
First, make sure all your ends are securely sewn in. I find this a great help to have them done before.
Then line up the ends of your two strips, wrong sides facing one another. I like my sc edging to appear on the right side of my work. If you prefer it on the back side, then work with right sides facing. Whichever you do, do it the SAME way for all strips.
Also, make sure that you work your single crochet from the same side (angle) or your single crochets will face differently on each strip. In other words, if you are sitting with your pieces laid out in front of you, you grab your first two pieces and begin working. Continue working from that side and joining them. Don’t get up and go to the other side and start working from the end. If you do some of your single crocheted edgings with lean towards the right and some will lean toward the left. And YOU will end up ripping.

Line up your strips. The little humps that appear along the edge of your work when making single crochets should all be lined up next to one another. This will keep you from skipping any. If you’re still concerned or you don’t know what I’m talking about, count off and use a clip, stitch marker, or safety pin to mark rows. In other words, count off 10 rows and place a pin (on both pieces). When you get to your marker, you should be on the same row on both strips. If you’re not, you messed up.
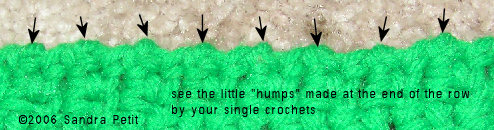
With the humps lined up, your pieces wrong sides together, and your yarn in front of you, insert hook in the first stitch on the side facing closest to you. Go through to the stitch on the second piece (the one you’re joining this one to), yarn over and pull through, yarn over and pull through both loops to complete a single crochet.
Insert hook into next stitch over across row, taking care that you continue to keep the “humps” together. If you don’t, then when you get to the end of your row you might have extra on one side or the other. Now, this presupposes that you have made the same number of rows on each piece.
Here are some pics showing progression.

Joining Same-Sized Squares in Rows and Columns with Single Crochet
This is a different, more complicated method of joining with a sc. I’ve never seen it anywhere else though I’m sure someone must have done it. I developed the method so I wouldn’t have to sew in so many ends. The method takes a bit of space and a time commitment as I leave my squares laid out until I’m done so I don’t get mixed up. If it doesn’t matter in what order the squares are placed, you don’t have to lay them out. Just grab the next one.
Decide if you are going to do columns or rows first. I did rows first and then columns.
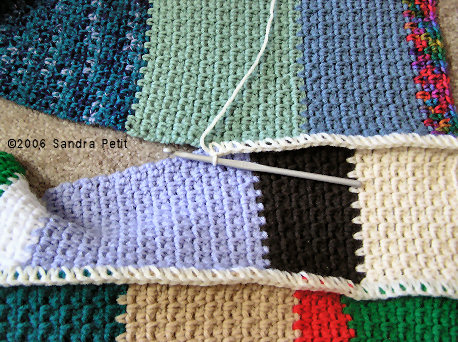
Here are pics showing the partially completed ghan. The picture shows the rows finished and two columns left to do. See where it’s open between the last two columns?
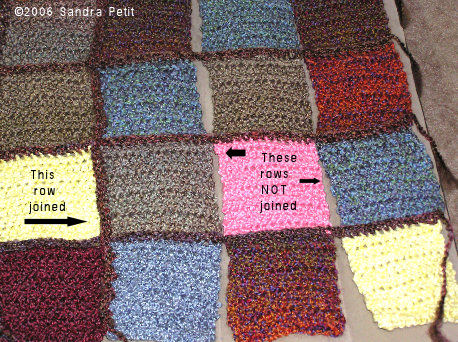

I joined the first square of row 1 to the first square of row 2 with a single crochet. Then, without breaking yarn, I attached the next two (second square of row 1 and second square of row 2) so that I now had four squares joined across the width, but the length was still open. You see that I am not joining squares to one another in the conventional sense of joining a row of squares or a column of squares. I am joining one row to the next row without first joining the squares, saving myself a whole bunch of trouble and a lot of ends. 🙂
I continued along the row until all of the first row and second row squares were joined across the width. Then I attached the third row squares, still leaving the length undone.
You have to be careful not to flip the squares the wrong way if it is important that they stay in the order you lay them in. Of course, this is important no matter which method you’re using to join the squares in an afghan.
When I finished all the rows across, I began to single crochet along the length. Each square was already “attached”, but the in-between the squares had to be sewn together. I was careful to make sure the squares were side by side as they were joined. In this case, it was easy because all the squares were the same size. Thank you to whoever made these squares!
That’s it. When I was finished with the joining, I put a border around the whole thing, sewed in the few ends and voila!
Reverse Single Crochet Assembly
This method is the same as joining with single crochet, except you will work from left to right.
Place squares wrong sides together since this is a decorative join meant to be seen. You will be working on the front side.
insert hook through the leftmost stitch of both squares and pull through to connect the two squares, chain one, *insert the hook into the next stitch to the right (not in the stitch you just completed, but the next one, draw up a loop, yo as normal and pull through both loops on the hook. rep from * across row.
Joining with reverse sc is a bit more difficult and it is easy to miss a stitch on your back piece so take care during the assembly process.
Single Crochet Assembly with Chains
Video DemonstrationVideo Demonstration
This method will work with any number of granny squares and the squares can be any size. You can join columns together first or rows first. It doesn’t matter which way you go.
If your final row is worked in the same color as your join it will be easier to weave the tails in. However, it will not give the “outline” look. It just depends on what you want.
